
SOMATIC TRAINING — CURRICULUM
There are 12 classes. Each lesson contains a series of images and activities that promote efficient movement dynamics. The images for each session are given below the list of classes. Each lesson is being
added for the relevant lesson that takes place starting 1/17/19 on Thursdays 7:30–8:30 at Payne Whitney Gym, 5th floor Room D.
1. Weight-bearing: Sitting, Standing, Walking; Releasing head and tail; Constructive Rest Position (CRP)
2. Counter-thrust to Gravity: Arches and Domes of the Body; Climbing Stairs
3. Constructive Rest in detail
4. Movement at the Joint Center: Bending and Extending; Joint Balance
5. The Upper Body is Not a Support: Ribcage, Shoulder Girdle, Sternum; Breathing
6. Review
7. The Pelvis as a Bowl
8. The Spine as an Open Joint — Transitions between Vertebrae
9. The Spine as an Open Joint — Sacrum & Coccyx
10. CRP with Tactile Aid
11. Upper Torso, Rolling, Rotation
12. Movement
Lesson 1 | It Begins with Pelvis, where the Center of Gravity Lives.
1) Pelvis front and back.


2) Sit on your Sitbones (ischial tuberosities).

3. Sit like a tenpin (bowling pin) — balanced around your central axis.

4. The Spine and its Guide Wires

5. Notice the Hole in the Back of the Pelvis

6. The Skull and Atlas at the top of the Spine (Sweigard)

7. Typical Vertebra (Sweigard)

8. Count Down the Back of the Lumbar Vertebrae — tails drop and the front rises (see also #5 for the transition)

9. Find your Central Axis when you Stand and Walk

10. Constructive Rest Position (CRP)

Lesson 2 | Counter-thrust to Gravity: Weight-bearing Transitions Rise Via Domes, Arches & Spires of the Body; Climbing Stairs.
1. Feet, Ankles


2. Knee (Sweigard)

3. Iliofemoral socket

4. Pelvic arches (Sweigard)

5. Psoas Major and other muscles of the pelvis — Anterior view (Clark; Sweigard)


6. Diaphragm (Sweigard)

7. Neck (Gray’s Anatomy 1959)

7a. Review Skull and Atlas — Lesson 1, #6
8. Cranium — Dome


9. Cone

Lesson 3 | Constructive Rest Position (CRP) — Imagery & Tactile Aid
1. Review

2. CRP — Imagery: The Empty Suit of Clothes (Sweigard)
![]()
The trousers have a zipper in front, legs are bell-shaped, and there is a heavy belt buckle in front center. The coat has a circular neck but no collar and a zipper on the upper front. There is a soft shirt collar inside the coat neck. The head is an empty balloon. The feet are tassels.
In CRP, the trousers are supported at knees by cross bar of an imaginary hanger suspended from the ceiling. The arms of the coat rest across the front of the coat. The suit is disheveled.
Images and Tactile Aid descriptions:
1- coat is full of sand and sinks to ground
2- coat is wrinkled; smooth it down the back
3- smooth the coat around toward center seam in front
4- zip up the front zipper on the trousers and let the heavy belt sink down
5- zip up front of coat
6- smooth wrinkles up and out of soft shirt collar
7- one leg at a time, empty trousers into thigh socket, noting the sinking of the inner edge of the crease
3. Nine Lines of Movement
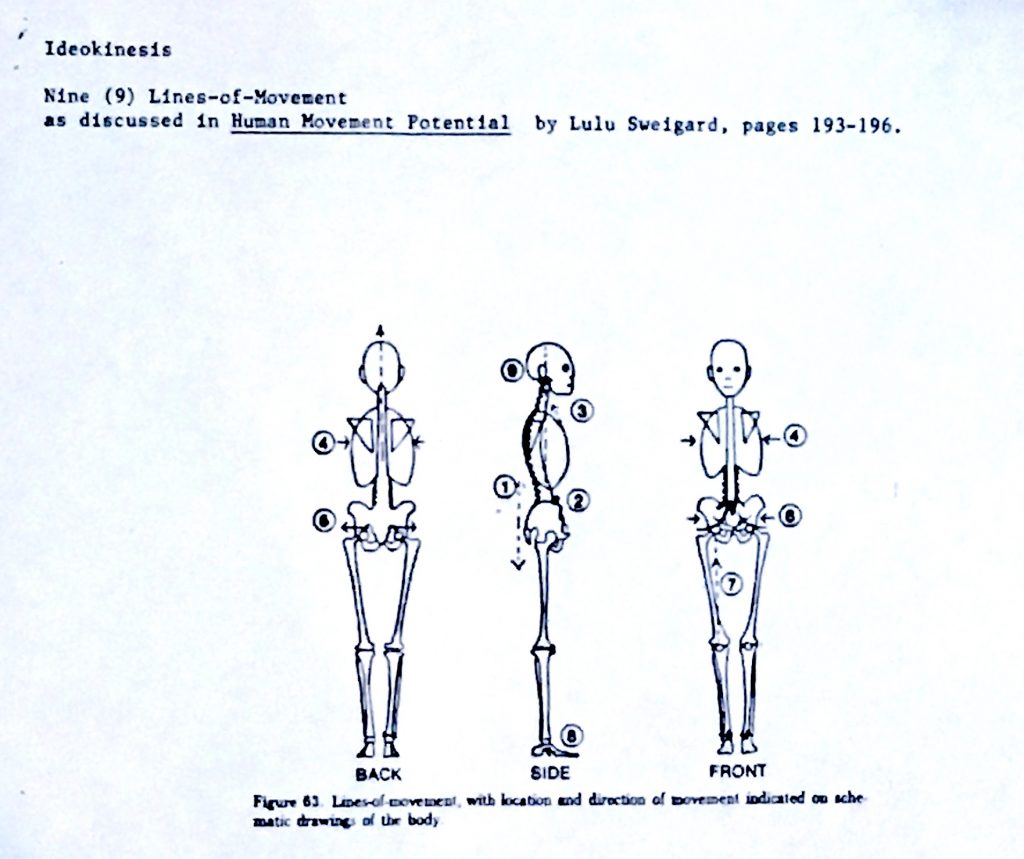
Using the imagery and tactile aid have been demonstrated over time to make these changes in postural measures (the 9 lines of movement)
1- lengthen spine downward
2- shorten distance between mid-front of pelvis (pubic symphysis) and 12th thoracic vertebra
3- movement from top of sternum to top of spine
4- narrow the rib-cage
5- widen across the back of the pelvis
6- narrow across the front of the pelvis
7- movement from center of the knee to center of the iliofemoral joint
8- movement from big toe to outside of the heel
9- lengthen the central axis of the trunk upward
4. Down the Back — Up the Front

5. Dropping the Tails of the Vertebrae

Lesson 4 | Bending & Extending; Moving at the Joint Centers
1. Review: Sitting, Standing, Walking
2. The Folding (Bending) 1/2 and the Non-Folding 1/2

3. Bicycle Chain in the Torso, while “bouncing” on the heads of the Femurs

4. The Plane through the Iliofemoral (hip) Joints; Gliding to Fold

5. Drawing the Psoas lines on the diagram

6. Floor Work:
1- drawing psoas lines on the body
2- folding at the hip joint by following the psoas line — Bending and Extending
3- rolling
4- rising
5- getting up & down on the vertical, using folding & curving
Lesson 5 | The Upper Body is Not a Support: Ribcage, Sternum, Shoulder Girdle and Breathing
1. Review: psoas lines, bending (folding using the gliding plane), bouncing on heads of the femurs
2. Lines of Support (Clark)

3. The Upper Extremities are NOT in the Lines of Support (Sweigard)

4. The Front of the Shoulder Girdle (Clark)

5. The Back of the Shoulder Girdle (Clark)

6. The Sternum and Clavicle (collar bone) (Clark)

7. Manubrium articulations (Sweigard_

8. Suspension of the Ribcage

9. Drop ribs, shoulders & arms out of the support image (look at #2 above: Lines of Support)
10. Floor work — in CRP
1- draw psoas lines, flex hip and carry line up spine, releasing ribs, shoulders & arms
2- release psoas, extend leg; then return to CRP position
3- slowly drop knees to side and follow through spine/torso; center back to CRP
4- getting up and down
11. Sitting work — Breath Flow (Barbara Clark)
Learn to start the breath at the back of the waist and moving down into pelvis…like a yawn.


12. Sitting work — Arm raising with breath — start with hands on thighs
1- first, one arm at a time — raise while inhaling — hand resting on thigh, bend at elbow and bring to core, then up
2- lower when exhaling — reverse path
3- do both sides, then do both arms together
4- allow ribs to breathe

Lesson 6 | Review
Lesson 7 | The Pelvis as a Bowl
1. About the “pelvis” -
https://www.dartmouth.edu/~humananatomy/resources/etymology/Pelvis.htm
Pelvis –Nice simple etymology: Pelvis is just the Latin word for a basin or bucket, both of which the anatomic pelvis resembles – somewhat. Acetabulum – This little word is borrowed directly from the Latin where it has the meaning of a little vinegar cup.
1- pubic bones & pubic symphysis
2- ischium
3- ischial tuberosities
4- illium
5- anterior superior spine of the ilium (ASSI)
6- sacro-iliac joint
1- start sitting, eyes closed
2- in your mind’s eye, slowly draw the circle clockwise, then counter-clockwise
3- using the inner circle in spirals and turns while sitting, moving and in constructive rest
Lesson 8: Opening the Weight-Bearing Joints
1. The legs — finding the synchrony of flexing, rolling in, extending, unrolling

2. Pelvis circle with central axis

3. The Axis — C2 vertebra

4. Central axis, walking with legs, pelvis, spine

Lesson 9: The Spine as an Open Joint

Transitions for Open Spine (reminder: VERY SMALL MOVEMENTS)
- Condyles -> C1 (Atlas) open space
- Atlas -> C2 (Axis) free spiral
- Axis -> C3 down tail
- C3 -> C4 up front of body
- C4 -> C5 drop your chin
- C5 -> C6 open back of neck
- C6 -> C7 inhale
- C7 -> T1 exhale & allow neck to rest on T1
- T1 -> T2,3,4,5 drop tails
- T5 -> T6,7 open/hug/rotate
- T7 -> T8,9,10,11 widen & inhale
- T11 ->T12 exhale, center & life dome (diaphragm)
- T12 -> L1,2,3 drop tails
- L3 -> L4 open pivot & side curve
- L4 -> L5 lift front
- L5 -> Sacrum hang hollow
- Sacrum – inhale & open around back as pubis closes
- Coccyx – unfurls & exhale as energy curves under sitsbones & up public arches
Lesson 10 | Tactile Aid — CRP & the Spine
Review images from Lesson 3
Lesson 11 | Upper Torso, Rolling, Rotation
Review images from Lesson 5:
New image — sitsbones inward rotation:
